Introduction
Several Azure services can help you migrate resources successfully to Azure. Azure Migrate and the Azure Database Migration Service are two such services.
You are the solution architect for a manufacturing company that is planning to move several datacenters to Azure. You have been asked to plan your migration and to identify the tools and services you can use to migrate your company’s services. Your workloads consist primarily of VMware virtual-machine-based workloads with data stored in relational databases.
In this module, you learn how Azure Migrate can:
- Assess your environment’s readiness to move to Azure.
- Estimate monthly costs.
- Get sizing recommendations for machines.
You also learn how Azure Migrate can migrate virtual machines to Azure. Finally, you learn about the Azure Database Migration Service, which helps you migrate your SQL workloads to the cloud.
In this module, you will:
- Discover how Azure Migrate can assess your existing workloads and plan your Azure Migration.
- Learn how Azure Migrate and the Azure Database Migration Service can migrate your systems to Azure.
- Knowledge of cloud and traditional architecture concepts.
- Knowledge of networking, compute, and database systems
Plan your Azure migration
Your first task is to plan your company’s migration to Azure. You need to put together a plan to present to your leadership team to get their support and approval.
In this unit, we cover some considerations and methods you can use to plan your migration to Azure. Every situation is different, but by following some standard principles, you can achieve your goals in the best possible way and in the shortest amount of time.
You can use a framework of Assess, Migrate, Optimize, and Monitor as a path for migration. Each stage focuses on a particular aspect of ensuring the success of a migration
.![]()
Let’s look at what’s involved at each stage.
![]()
Start with a full assessment of your current environment. Identify the servers, applications, and services that are in scope for migration. You can then bring in the IT and business teams that work with those services. By bringing these teams in as early as possible in the process, you ensure that they can provide guidance, feedback, and support for the migration.
Next, produce a full inventory and dependency map of servers and services that are in scope for migration. The inventory and map determine how those services communicate with each other. A modern business might have hundreds of applications spread across the estate. Each application must be fully investigated before any work takes place.
For each application, there are multiple migration options:
- Rehost: Recreate your existing infrastructure in Azure. Choosing this approach has the least impact because it requires minimal changes. It typically involves moving virtual machines from your data center to virtual machines on Azure.
- Refactor Move services running on virtual machines to platform-as-a-service (PaaS) services. This approach can reduce operational requirements, improve release agility, and keep your costs low. Small enhancements to run more efficiently in the cloud can have large impacts on performance.
- Rearchitect: You might be forced to rearchitect some systems so they can be migrated. Other apps could be changed to become cloud native, or to take advantage of new approaches to software such as containers or microservices.
- Rebuild: You might need to rebuild software if it costs more to rearchitect than it does to start from scratch.
- Replace: While you are reviewing your estate, you may find that third-party applications could completely replace your custom applications. Evaluate software-as-a-service (SaaS) options that can be used to replace existing applications.
Review each application to determine which option is the best fit.
Applications are used by specific sections of the business. The owners and superusers of applications have a wealth of experience on which to call. Involving these people in the planning stage increases the chance of a successful migration. These resources can offer guidance in areas where the person running the migration project might have knowledge gaps. Often, each area of the business appoints business owners to manage specific sections.
Part of the business’s plan to migrate to Azure could be to reduce costs, because moving to the cloud offers cost savings over running your own on-premises estate. After you complete the initial scoping exercise, use the Azure Total Cost of Ownership (TCO) Calculator to estimate the real costs of supporting the project in light of the company’s longer-term financial goals.
Several tools and services are available to help you plan and complete the four stages of migration. In some migrations, you may only need to use one or two of these tools.
| Service or tool | Stage | Use |
| Azure Migrate | Assess and migrate |
Performs assessment and migration of VMware VMs, Hyper-V VMs, cloud VMs, and physical servers, to Azure. Also performs assessment and migration of databases, data, virtual desktop infrastructure, and web applications, to Azure. |
| Service Map | Assess |
Maps communication between application components on Windows or Linux. Helps you identify dependencies when scoping what to migrate. |
| Azure TCO Calculator | Assess |
Estimates your monthly running costs in Azure versus on-premises. |
| Azure Database Migration Service | Migrate |
Uses the Data Migration Assistant and the Azure portal to migrate database workloads to Azure. |
| Data Migration Tool | Migrate |
Migrates existing databases to Azure Cosmos DB. |
| Microsoft Cost Management | Optimize |
Helps you monitor, control, and optimize ongoing Azure costs. |
| Azure Advisor | Optimize |
Helps optimize your Azure resources for high availability, performance, and cost. |
| Azure Monitor | Monitor |
Allows you to monitor your entire estate’s performance. Includes application-health monitoring via enhanced telemetry, and setting up notifications. |
| Microsoft Sentinel | Monitor |
Provides intelligent security analytics for your applications. |
![]()
Deploy cloud infrastructure targets
You need destination systems and services on Azure to which you can migrate. The scope of your migration has been defined as your company’s current VMware machines and existing relational databases. In this scenario, you don’t need to create the resources in Azure beforehand. The two tools you use to do the migration, Azure Migrate and the Azure Database Migration Service, can create the required Azure resources for you.
In other situations, you may need to set up resources in Azure to have them available as a migration destination.
It is often best to start with a small migration instead of migrating a large, business-critical workload. This approach lets you become familiar with the tools, processes, and procedures for migration. It can reduce the risk of issues when you migrate larger workloads. As you become more comfortable with the migration process, you can progress to larger and more business-critical workloads.
Each tool guides you through the migration. The steps to complete them are covered in later units. At a high level, the steps are:
- Prepare the source (vCenter Server) and target (Azure) environments.
- Set up and start the replication between the two.
- Test that the replication has worked.
- Fail over from the source servers to Azure.
For the database migrations, the high-level steps are:
- Assess your on-premises databases.
- Migrate the schemas.
- Create and run an Azure Database Migration Service project to move the data.
- Monitor the migration.
Decommission on-premises infrastructure
After all migrated workloads have been tested and verified as successfully migrated to Azure, you can decommission all your on-premises systems. Even after you decommission them, it can be useful to keep backups and archive data from the migrated systems. This practice gives you a historical archive of data in case it’s needed. This data could be stored on-premises, or in a cloud-storage service such as Azure Blob storage.
![]()
After your services are migrated, it’s important to optimize them to ensure that they’re running as efficiently as possible from a cost and performance standpoint.
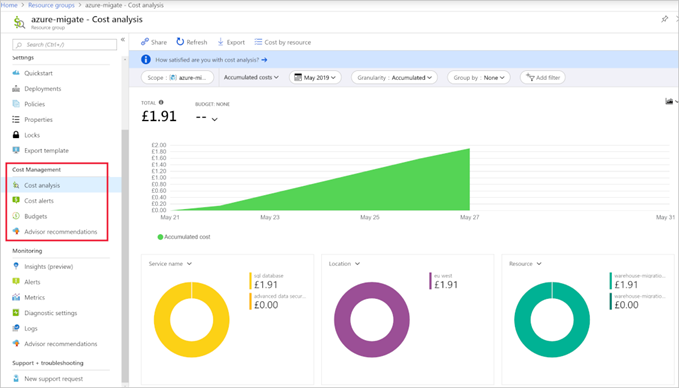
Use Microsoft Cost Management to start analyzing your Azure costs at different management scopes. For example, by choosing a subscription in the portal, you can see a breakdown of all the resources for that subscription. You could also view a resource group to see all the costs associated with all the resources in just the selected group:
Review opportunities to improve
Microsoft Cost Management shows you cost-reduction advice from Azure Advisor. The advice includes suggestions like reducing the performance of underused VMs, making use of extra discounts, or reserving resources instead of paying as you go. Azure Advisor also shows you recommendations for network security, high availability, and performance. Review the recommendations that Advisor presents to further optimize your environment.
![]()
Integrate health and performance monitoring
Azure Monitor can capture health and performance information from Azure VMs if you install a Log Analytics agent. You can install the agent on machines running either Windows or Linux, and you can then set up alerting and reporting.
You can set up alerts based on a range of data sources, such as:
- Specific metric values like CPU usage
- Specific text in log files
- Health metrics
- An autoscale metric
It’s also important to have event logging and visibility into security events across your enterprise. Microsoft Sentinel provides security information and event-management (SIEM) capabilities, along with artificial intelligence to help you protect against, detect, and respond to security events. This information helps security operations (SecOps) teams triage critical alerts and prioritize work effectively.
The remainder of this module focuses on the Assess and Migrate stages. There are more resources to help you with the Optimize and Monitor stages in the Learn more section at the end of this module.
Assess your environment with Azure Migrate
You can perform an agentless environment discovery or use agents to perform a dependency analysis. The Azure portal helps you assess your current on-premises workloads. After the assessment, Azure Migrate makes recommendations for the size of VM you’ll need to provision.
In your role, you’ve been asked to plan the migration of the business’s on-premises environment to Azure. Because the server workloads are based primarily on VMware, you want to begin with those machines. You want to assess readiness for the move to Azure. You also want to estimate the costs for the resources the machines are going to consume on Azure, so the management team can set the budgets.
In this unit, we look at Azure Migrate, a service you use to assess readiness and assist with migration to Azure from an on-premises environment.
Azure Migrate is a free service provided by Microsoft that discovers, assesses, and migrates on-premises systems to Azure. The service helps with performance-based sizing calculations (virtual machine sizing, compute/storage) for the machines that you migrate, and helps estimate the ongoing cost of running these machines in Azure. Azure Migrate can assess both Hyper-V and VMware-based virtual machines, and physical servers. Azure Migrate also supports the visualization of dependencies for those machines. It helps you create groups of machines that can be assessed together and ultimately migrated to Azure at the same time. Understanding the dependencies gives you confidence that nothing is left behind when the migration is complete.
When you use Azure Migrate, the assessments it produces are created within a project that is set up in the Azure portal. Before creating a project, you can group the VMs according to the various types of VM workloads that you have, assessing and potentially migrating them together. For example, you might group all servers that run a common application. After you’ve defined the groups you need, create your project.
After you create a project, Azure Migrate requires you to complete two steps to produce an assessment:
- Discover your virtual machines.
- Create assessments.
To perform an agentless discovery, the Azure Migrate: Server Assessment tool guides you through downloading a lightweight collector appliance, which carries out the discovery of systems in your environment. You can download the collector appliance to VMware or Hyper-V environments. Import and spin up the collector appliance, then complete its configuration to connect it to the Azure Migrate project.
The collector gathers data about VM cores, memory, disk sizes, and network adapters. Where applicable, the collector also gathers performance data like CPU and memory usage, disk IOPS, disk throughput, and network output.
When the data collection is complete, it’s pushed to your Azure Migrate project. On the Azure portal, you can now view all the discovered systems or download a report to review.
For VMware environments, you can visualize the process as follows:
If your company wants details about how the VMs are related to each other (via a visualization of dependencies), you can install agents to collect that data. Azure Migrate prompts you to install the Microsoft Monitoring Agent and Dependency Agent on each VM. The agents are available for both Windows and Linux.
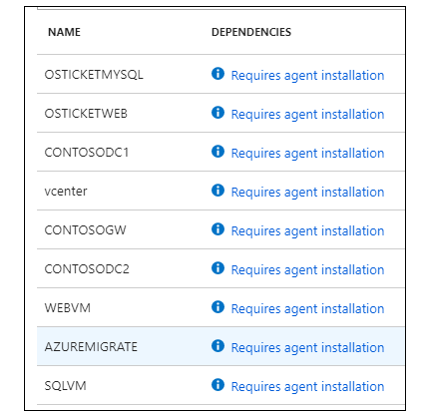
After these agents are installed and configured, they collect data like fully qualified domain names (FQDNs), operating systems, IP addresses, MAC addresses, running processes, and incoming and outgoing TCP connections.
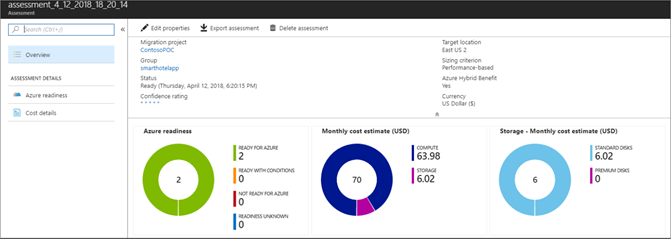
Azure Migrate can now assess your environment’s readiness to be migrated to Azure. In the Azure portal, select the Assessments section, and then select Create assessment. An assessment is created with default settings. You can change these settings later by editing the properties of the assessment.
Migrate servers with Azure Migrate
After using Azure Migrate for your assessment, you can decide which of your servers are good candidates to migrate to Azure. You’ve presented your findings to the IT Director, and now you want to continue with a test migration to assess the end-to-end process. Azure Migrate can also perform an agentless migration of virtual and physical servers into Azure. You’ve chosen to use Azure Migrate to complete the migration of virtual machines.
In this unit, we review Azure Migrate and how to use it to migrate specific workloads to Azure.
Add Azure Migrate: Server Migration to your Azure Migrate dashboard, which carries over machines and insights from the assessment. You can begin your replication by selecting Replicate in the Migration and modernization tool window. Azure Migrate replicates up to 100 VMs simultaneously. If you need to do more, we recommend that you create multiple batches. Times for replication vary based on the number and size of virtual machines, along with connection speeds between your data center and Azure.
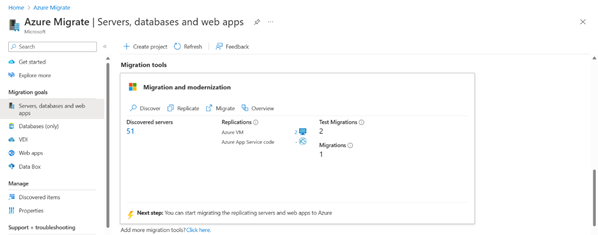
Test migrated virtual machines
Once all your targeted virtual machines are replicated and into Azure, you can test your virtual machines to ensure everything works before you migrate them into production. The process runs a prerequisite check, prepares for the test, creates a new test virtual machine, and starts it. This process takes a few minutes.
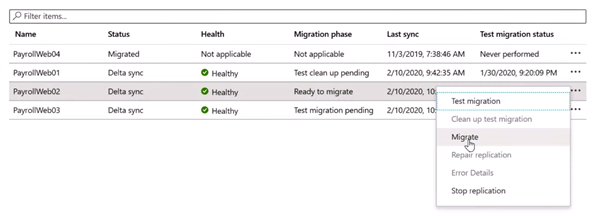
Migrating the virtual machines into production
Once you’re ready for the production migration, select Migrate from the Replicating machines window. The process prompts you to shut down the virtual machine to avoid any data loss and perform a final replication. We recommend running this process during off-peak business hours, because the virtual machine will be down for a few minutes.
Now Azure Migrate runs through the production migration process. You can check the status as it validates the prerequisites, prepares for migration, creates the Azure VM, and starts the Azure VM.
After the migration has taken place, review the security settings of the virtual machine. Restrict network access for unused services by using network security groups. Deploy Azure Disk Encryption to secure the disks from data theft and unauthorized access.
Consider improving the resilience of the migrated machines by:
- Adding a backup schedule that uses Azure Backup.
- Replicating the machines to a secondary region using Azure Site Recovery.
Complete cleanup tasks for the remaining on-premises servers. Such tasks may include removing the servers from local backups and removing their raw disk files from storage-area network (SAN) storage to free up space. Update documentation related to the migrated servers to reflect their new IP addresses and locations in Azure.
Migrate databases with Azure Database Migration Service
Azure Database Migration Service enables online and offline migrations from multiple database sources to Azure data platforms, all with minimal downtime. The service uses the Microsoft Data Migration Assistant to generate assessment reports. The Database Migration Service then performs the identified tasks.
During the early stages of the migration project, the IT Director requests that the current SQL Server cluster is included. The cluster hosts several line-of-business application databases.
In this unit, you see how to use the Data Migration Assistant and Database Migration Service together. They provide a way to move on-premises SQL Server databases efficiently to Azure.
The migration service provides two different ways to migrate SQL Server databases: offline migration or online migration. An offline migration requires shutting down the server at the start of the migration, which means downtime for the service. An online migration uses a continuous synchronization of live data, allowing a cutover to the Azure replica database at any time. The online option is the better of the two if you need to minimize downtime for your workload.
Azure Database Migration Service has two pricing tiers:
- Standard: Supports only offline migrations. There’s no charge to use this tier.
- Premium: Supports both offline and online migrations. There’s no charge for the first six months. After that period, you’ll incur charges.
You can migrate your relational database to several different destinations in Azure:
- Single Azure SQL Database instance: A fully managed single SQL database
- Azure SQL Database managed instance: 100% compatible with SQL Server Enterprise Edition Database Engine, but missing some minor SQL Server features.
- SQL Server on Azure Virtual Machines: An infrastructure-as-a-service (IaaS) offering that runs a full version of SQL Server and supports all the features of SQL Server.
- Azure Database for MySQL: An Azure database service based on the MySQL Community Edition, versions 5.6, 5.7, and 8.0.
- Azure Database for PostgresSQL: An Azure database service based on the community version of the PostgreSQL database engine.
- Azure Cosmos DB: A globally distributed, multi-model, fully managed database service.
Your company’s database needs are simple, so the fastest and cheapest option is to migrate your database workloads to a single Azure SQL Database instance.
Overview of database migrations
The Data Migration Assistant guides you through the process of migrating your database. You take your existing relational databases, split out the database schemas, and then recreate them in the destination Azure SQL Database instance. With the new schema in place, the data for each database can then be copied to Azure. Finally, you check that the new databases are performing as expected.
Both offline and online migrations have the same prerequisite tasks:
- Download the Data Migration Assistant: Download and install the assistant locally on your on-premises servers running SQL Server.
- Create an Azure Virtual Network instance: This virtual network is for Azure Database Migration Service when it uses the Azure Resource Manager deployment model. The virtual network provides connectivity to the on-premises environment.
- Configure the network security group: The security group associated with the new virtual network should allow inbound connectivity to the service via ports 443, 53, 9354, 445, and 12000.
- Configure the Windows Firewall: You must configure the firewall to allow the Database Migration Service to connect over port 1433. You can also open port 1434 if multiple named instances on dynamic ports exist on the same server.
- Configure credentials:
- Add CONTROL SERVER permissions to the credentials used to connect to the source SQL Server instance.
- Add CONTROL DATABASE permissions to the credentials used to connect to the target Azure SQL Database instance.
- Provision your target database in Azure: Create the database that is the target of the migration. Size it appropriately for the migrated workload.
Assess the on-premises databases
Ensure that all the communication ports are open and check the connectivity between the source and destination servers before the migration tasks begin. Using the Data Migration Assistant, create an Assessment project, give the project a name, and select the source and target servers. Provide the connection details for the source server, including credentials with permission to access it. On the database selection screen, choose the database you want to migrate.
The assessment generates a report on completion, including a set of recommendations and alternative approaches that could be taken for the migration. The report shows you any compatibility issues between the source and destination databases that could cause the migration to fail. Address the issues in the report, running it as many times as you need to make sure that the issues have been fixed.
A Data Migration Assistant report looks like this:

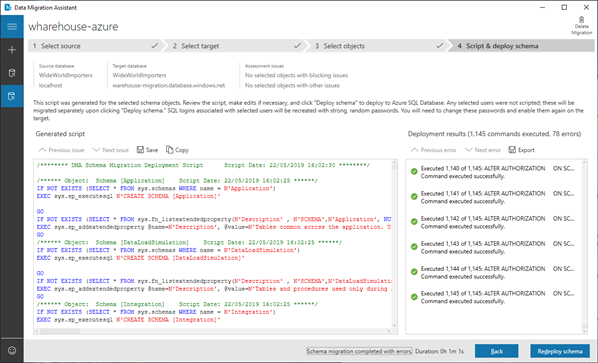
Migrate the schema using the Data Migration Assistant
Each database has a schema that represents its entire structure. The schema defines the rules for how its data is organized and defines the relationships between data elements. Migrate the schema before you migrate all the data in the database. The schema creates an empty structure on the new Azure SQL database, and that structure matches that of the on-premises source database. Migrating the schema also validates the connectivity before you do the full data migration.
To use the Data Migration Assistant to migrate the schema, create a new Migration project. Select your on-premises SQL Server instance as the source server and your Azure SQL Database instance as the target server. Set the scope of the migration to Schema Only. After you connect to the source database, choose the schema objects to deploy to the new SQL database. The Data Migration Assistant creates a script to take the required actions. Then, select Deploy Schema to run the script. When the script is complete, check the target server to make sure the database has been configured correctly.
Migrate your data with Database Migration Service
In the Azure portal, follow these steps to create an instance of Azure Database Migration Service, and then to run it to migrate the data in your databases:
- Create an instance of Azure Database Migration Service. Choose the pricing tier based on whether you need an online or offline migration.
- Create a new migration project. Choose the type of migration you want to perform, either offline or online.
- Specify source and target server details, including the authentication information.
- Identify the databases. Map the relevant target database on the target server to the source server.
- Run and monitor the migration.
- Select the Run migration button to start the migration. The migration activity screen appears.
- Track the progress until the process shows as completed.
- After all the required databases are migrated, check them to make sure they’re working.
When these steps are complete, your schema and data have been migrated to the Azure SQL Database instance. You can then shut down and decommission your on-premises databases and servers.
Summary
In this module, you learned about planning a migration to Azure. You learned how in-depth planning, scoping, and due diligence can offer tangible benefits at migration time.
You also learned about several of the services that are offered to assist with your migration. First, Azure Migrate offers a comprehensive way to assess your existing environment. It provides recommendations about sizing and compute requirements for your different workloads. Second, you can also use Azure Migrate to migrate servers to Azure virtual machines. Last, Azure Database Migration Service helps you move SQL workloads from on-premises servers to Azure. Like Azure Migrate, it provides comprehensive guidance and recommendations to assist you.
To learn more about the tools and services available to help you migrate to Azure, check out these articles:
For information on optimizing your environment, reference these Microsoft Learn modules:
- Plan and manage your Azure costs
- Build great solutions with the Microsoft Azure Well-Architected Framework
For information on monitoring your environment, check out these articles:
This entire article can be download from here