Custom Receive Connector for an Application Hosted Externally to use Exchange Server 2016 as a Relay
My Exchange 2016 is a highly available multi-tenant environment. I have a tenant who has an application hosted with a third party and want to use our Exchange 2016 as a relay to send notifications to their customers.
Receive messages from a server, service, or device that does not use Exchange.
In this scenario, the Receive Connector listens for connections on port 25, but only from the specific IP address of the service, or device. It is also likely that this scenario requires some type of authentication.
- Login into Exchange Administrative Center (EAC) https://mail.contoso.com/ecp
- In the EAC, go to Mail flow > Receive connectors, and then click Add ().
- The New receive connector wizard opens. On the first page, configure these settings:
- Name: Type something descriptive. For example, Inbound mail from security appliance.
- Role: Select Frontend Transport.
- Type: Select Custom.
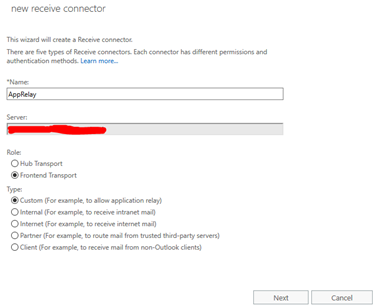
When you’re finished, click Next.
- On the second page of the wizard, do one of these steps in the Network adapter bindings section:
- Leave the default values of IP addresses: (All available IPv4) and Port: 25.
- If it’s required for your scenario, you can restrict the Receive connector to a valid local IP address on the server:
- Select the default entry IP addresses: (All available IPv4) and Port: 25, and then click Edit ().
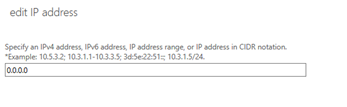
- In the Edit IP address dialog that opens, configure these settings:
- Address: Select Specify an IPv4 address or an IPv6 address, and type in a valid local IP address to use for the connector.
- Port: Leave the default value 25 selected.

When you’re finished, click Save.

When you’re finished, click Next.
4. On the last page of the wizard, configure these settings in the Remote network settings section:
-
- Select the default entry 0.0.0-255.255.255.255, and then click Edit ().
- In the Edit IP address dialog that opens, enter the IP address or IP address range of the service or device.
When you’re finished, click Save.

When you’re finished, click Finish.
5. Back at Mail flow > Receive connectors, select the connector you just created, and then click Edit ().
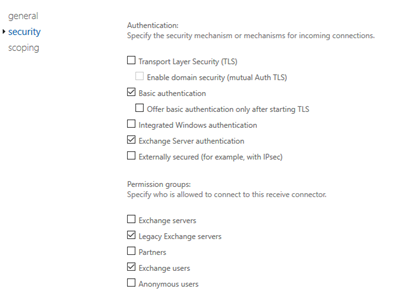
6. On the Security tab, configure the combination of authentication mechanisms and permission groups that are required for the service or device. For example:
-
- Leave Transport Layer Security (TLS) selected, select Basic authentication, and then select the Anonymous users permission group.
NOTE: I would avoid going with option “a” because the moment you select Anonymous users, there are chances that
Spoofing SPAM emails might start. Therefore, I preferred to go with Option b in my environment and works perfect
without any issue.
OR
-
- Clear Transport Layer Security (TLS), select Basic authentication and Exchange server authentication, and then select the Exchange users and Legacy Exchange servers permission group.
When you’re finished, click Save.
For more information about permission groups, see Receive connector permission groups.
Caution: Be very careful using the authentication mechanism Externally secured with the permission group Exchange servers. This combination allows the remote IP addresses specified in the Remote network settings section on the Scoping tab to anonymously relay messages through the Exchange server. For more information, see Allow anonymous relay on Exchange servers.
Warning: When using the authentication mechanism Basic authentication or Offer basic authentication only after starting TLS without the permission group Anonymous users as an authenticated relay connector, the routing of mail will always try to select the authenticated user or the organization's arbitration mailbox active mailbox server.
Click on the below link to download the pdf file for all the above steps:
Custom Receive Connector for an Application hosted externally to use Exchange Server 2016 as a Relay
Microsoft Reference Link: